

This pine cone Christmas tree is a fun and easy holiday craft your kids will love making! These cute Christmas trees made with pine cones are customizable, and you only need a few basic supplies to make them.
RELATED: Christmas Crafts for Kids

This is the perfect classroom craft as kids can customize and decorate their trees however they’d like!
Paint green Christmas trees or make brighter, colorful ones too! You can also make them colorful with colored pom poms or match your color scheme of your Christmas tree.

You can use other craft supplies you have on hand to decorate them – like glitter, beads, craft gems and more. Kids can even wrap ribbon around them to match their own Christmas tree at home.
These make great gifts to give to teachers, neighbors or grandparents.
Watch the Video Tutorial

Supplies Needed
- Pine cones – we used 3 to 5-inch size pine cones. Collect some outside or you can find them at craft stores or on Amazon.
- Pom poms – we used 1cm white pom poms. But you can also add any colors you’d like!
- Iridescent glitter (optional)
- Gold star foam stickers – you can also cut out your own stars using gold foam.
- Small clay pot saucers – these are 3 inch size saucers. You can buy them in bulk on Amazon or buy individual ones at a craft store (we got them at Michaels). You can also use a wood slice or thick felt as the base for the Christmas tree.
- Mod Podge or glue
- Hot glue (with adult assistance) or tacky glue
How to Make a Pine Cone Christmas Tree
1. Paint the saucers white.
Start by painting the clay pot saucers white. Allow them to dry.

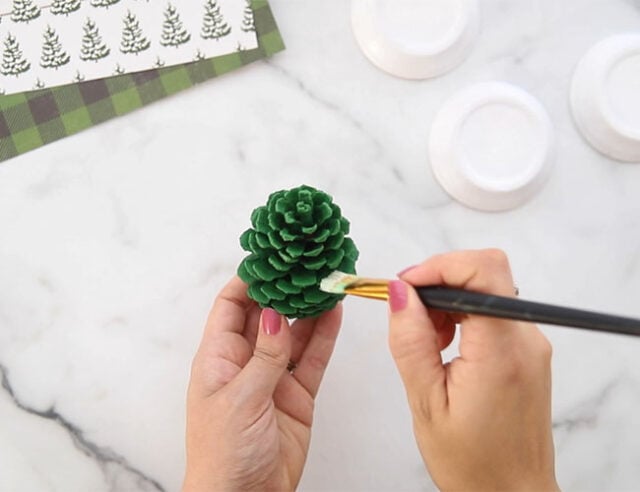
2. Paint the pine cones green.
Use green acrylic paint to paint the pine cones.
The painting doesn’t have to be perfect and will actually look like the brown branches of a real tree if some parts are left unpainted.
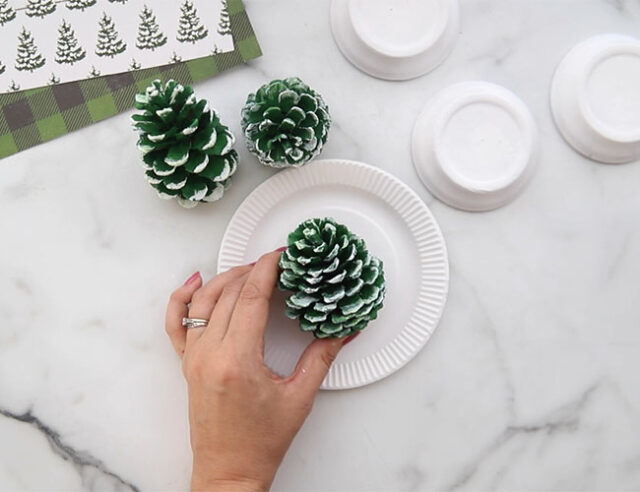
3. Dry brush the edges white.
Lightly paint the edges of the pine cones white to give it a snowy look.
The easiest way to do this is to only add a tiny amount of white paint to your brush (it’s almost “dry”) and then lightly tap around the edges of the pine cone.
4. Let the paint dry.
Allow the paint to completely dry before decorating.
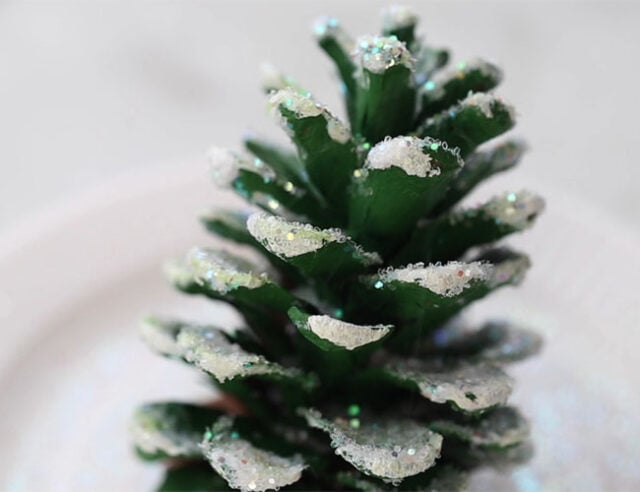
5. Add glitter to the pine cones.
Apply a light coat of Mod Podge (or white glue) to the pine cones.
While it’s still wet, sprinkle iridescent glitter over the pine cones.
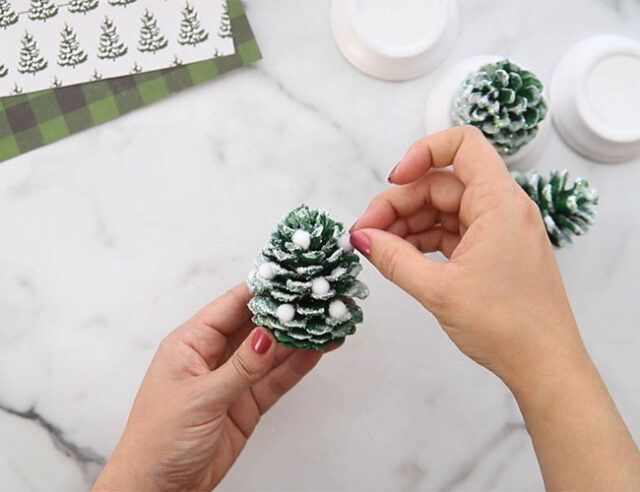
6. Add pom poms.
Glue small pom poms onto the pine cones. They’ll look like Christmas ornaments on your trees.
You can use a hot glue gun (with adult assistance) or we like to use a tacky glue which is stronger for gluing pom poms on.
7. Add a gold star on top of the pine cone.
Glue two gold star foam stickers together. Then, glue the star to the top of the pine cone to make the star tree topper.

8. Attach the pine cone to your painted saucer.
For the last step, hot glue (with adult assistance) the bottom of the pine cone to the clay pot saucer.

Your pine cone Christmas tree is done! See how many different styles of Christmas trees you can make using colorful pom poms or other crafting supplies.
Kids will love decorating the house with these during the holiday season! These also make great gifts.
See another pine cone Christmas craft by trying this pine cone Christmas wreath.


Share a Comment!
We LOVE hearing from you! Submit your question or comment here.
Your email address will not be published.
Required fields are marked *